Friday, July 29, 2011

Scrapmatts - My 1st DT Creations

I just LOVE Scrapmatts chippies and am so excited that Sofie and Andrew invited me to be part of their DT.  You really must check out the site HERE as there are some gorgeous new Federation chippies available and while your there pop on over to the gallery and prepare to be blown away by all the gorgeous creations from our DT and all our fabulous members... so very inspirational!!!

This month at Scrapmatts is an Australiana theme and I have 4 projects to share which I created with the yummy goodies I received in my parcel from Sofie and Andrew.

Live For Today
Just love the new Federation chippies as they have such beautiful detail.  I used the Federation Front Porch (CB4047 Aust Fed Front Porch 01) on this LO.  It came already coloured in a white mist and you can't really see it very well in this pic but I misted it with a soft gold for a lovely shimmery effect.  I used some gorgeous Pink Paislee pp's which I fussy cut and layered .  In one of my clusters I tucked in one of the new clock chippies (CB6063 Clocks 09) which come with lovely little detailed hands.  I backed it with a clock face which was cut from Bo Bunny timepiece pp and used a hand dyed doily for a little texture.


Learn To Pause
Decided to use these photos that I took of  Luke when he was much younger, which I absolutely love and printed them in sepia to go with my rustic theme.  
 
I used the Scrapmatts large and small Floral Design chippies (CB4034 Floral Design 01, CB 1118 Floral Design 05) as the leaves reminded me of gum leaves.  I inked the leaves and buds in green distress ink and then coated with crackle medium for a distressed look.
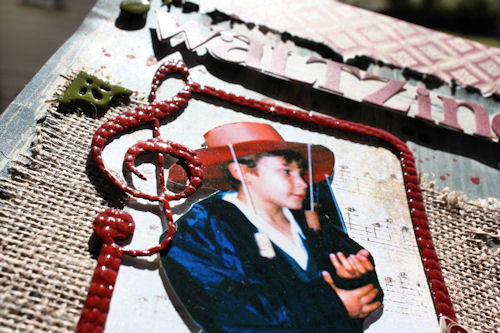

Waltzing Matilda
Thought this cute old pic of Luke all dressed up for his Grade 1 concert and singing Waltzing Matilda would be perfect for this month's theme.


I used the little corner chippies from the Federation Screen doors (CB5068 Screen Doors 03) and music notes (CB6017 Music Notes 02) which I inked in green and coated with glossy accents.  I silhouetted the pic of Luke and backed it with music pp then framed it with the music frame chippie (CB6006 Music Frame 01) which I embossed, inked and coated with glossy accents.  Couldn't resist adding one of the cute little birdies (CB1088 Birds 03) in my tree and inked it to match the colours in my LO.
So Happy to Have You Home
My last project was a sweet little card using the new Federation Screen Doors (CB5068 Aust Fed Screen Door 03).  This door came already coloured in white mist and I just backed it with some MME pp's and added the cute little kitty (CB1091 Cats 03) which I inked and covered with glossy accents.  I also used the corners which came with the Screen Door on the corners of my card and left them raw.

 Well that's it from me for now.. will be back in a few days with the new word and LO for Bird is the Word.

DONT FORGET there is still a few days left to put in an entry at Beyond the Door.. there are some fab prizes to be won!!! 

Thanks so much for stopping by and leaving some love :)))

Tuesday, July 26, 2011

my2angels Embellishm Me Kits

Want HANDMADE Embellishments??

Thought I would share the news on this fabulous embellishment kit club created by Tracy at my2angels check out her blog for more details.


Do you find yourself admiring the embellishments you see on online layouts and wonder how they find the time, creativity and money to produce them?
Does your budget not allow you to buy all the mediums and products you want?

Are you a bit afraid to spend so much on a product you may not use again?
Or maybe time just doesn’t allow you to create as often as you would like?


We have put together a monthly embellishment kit for you that will wet your appetite for new products and perhaps encourage you to try something a little different.

Each month we will send you my2angels embellishments and handmade creations, in which I can guarantee there will be a touch of Tim, a dash of charm and some altered chipboard to add to your creations.


A small sample of what to expect in your August Kit


This kit is about saving you from the expense of purchasing a myriad of expensive embellishment mediums, yet still allowing you to enjoy handmade embellishments using these mediums.

It’s also enabling you to ‘sample’ some of the top Brand name-embellishments – without the expense of purchasing large multi-item packs. This way, you can play with a little of everything, rather than a lot of one thing.

In fact, in some ways, this embellishment subscription kit could be called a sampler pack – allowing you to view used results with the products for a fraction of their cost - and decide if you would like to then purchase in larger quantities. 


For only $55 per quarter - paid in advance (this includes postage) - you will receive 3 kits (that’s 1 per month) sent on the 20th of each month.

That’s amazing value – all that yumminess and creativity -for less than $19 a month (average kit RRP $30.00)

No two handmade embellishments will be identical, thus giving you the ultimately unique embellishment kit.


You may cancel your quarterly membership at any time, however, we request that you do so with at least a months notice before the start of the next quarter, as kits are prepared and products ordered in advance.


AS A SPECIAL OPENING OFFER (AND TO GIVE YOU THE OPPORTUNITY TO SEE WHAT WE ARE OFFERING) WITHOUT COMMITTING FOR 3 MONTHS

WE HAVE ON OFFER A ONE MONTH SUBSCRIPTION ONLY FOR AUGUST ...

TRY US ... WE GUARANTEE YOU WON'T BE DISAPPOINTED WITH THE QUALITY AND QUANTITY OF PRODUCTS IN THE KITS

Friday, July 22, 2011

My2Angels - Ribbon/Lace

Hi Girls,

It's a bit of a long post from me for this week as I have a LO, 2 cards and tutorials to share so bear with me. This week My2Angels is focusing on using ribbons/lace and we are showing you techniques on how to incorporate them on your own creations.

First up is my Ribbon LO... (sorry about the colour of the pics, had trouble taking the photos).   I started with Kraft Cardstock (which is only 75 cents at Tracy's store.. bargain!!) for my background and then used the yummy Websters Yacht Club Diecut and other pp's from the Yacht Club range which I hand cut and layered with foam tape.  Websters pp's are just perfect for fussy cutting and are one of my fav ranges for this technique.

I added some textures to my LO by using some of  this beautiful cream lace flower trim to frame my photo and some hessian.  The roses were made by rolling some ric rac... loved trying out this technique and you can have a go at making your own by following Tracy's tutorial which is on her my2angels blog .. so easy to make!!
Using ric rac is a great way to simulate waves and I used some beautiful blue velvet ric rac here, creating some lovely soft textures.
With all the charms Tracy has in store, you're bound to find the perfect embellishment for your LO's and I used two of them here.  The Yacht charm which i tied with some Bakers Twine and the gorgeous fish charm which is swimming in amongst my ric rac waves.

I decided to combine stickers and pp's for my title by hand cutting the gorgeous alphas from Websters using the Yacht Club Alpha Stickers. I also hand cut the little white butterflies from the Websters Trendsetter Style 105 pp and finished off with one of  Tracy's fab stick pins and some Jingle Bells glimmermist.
With my 1st card I decided to go masculine and used the Websters Yacht Club pp's again which I hand cut and layered and some Websters Seaside Retreat for the background. For the ribbon detail on this card I scrunched the organza ribbon for some texture.  I have added a simple tutorial for those of you who haven't tried this before.
How cute is this turtle charm.. like I said before Tracy has a charm for all your LO's.  Check out the COMING SOON section at my2angels as Tracy has some new charms which will be available within the week.

For my 2nd card I went bright and feminine using more Webster pp's in the Spring Market & Wonderfall ranges & some Basic Grey for the background.  I hand cut & layered the papers and added some mini roses & a dragonfly charm for a little interest.  On the border of the card I layered some velvet ric rac and a border sticker from the Spring Market image and phrase sticker sheet.  I changed the colour of my white organza ribbon with some Tim Holtz Mustard Seed Distress Ink to match my pp's and then pleated the ribbon for some texture.  For the sentiment I used the Spring Market alpha stickers.
 I have put together 2 quick and easy tutorials on scrunching and pleating ribbon.
Scrunching Ribbon
Start with sticking down some double sided tape where you would like your scrunched ribbon.

and scrunch the ribbon as you go.. if you want a messier look don't be too particular about how you scrunch it.
Pleating Ribbon
Pleating ribbon is a similar technique but instead of placing the adhesive tape on your project I adhere it to the back of the ribbon to be pleated. You can just pull the backing off as you go, to make it easier, then pleat and stick down.  It will stick up, so you can use you sewing machine to stitch in place or place bits of tape under each pleat to for a nice flat finish.


Check out this link HERE at my2angels for more ribbon tutorials!!  Hope you enjoyed some the of the simple ways I incorporated ribbon onto my LO's and hope to see some of your ribbon inspired creations in our gallery.

Cheers, and thanks for stopping by
Cathy :))) 

Monday, July 18, 2011

Bird Is The Word - TODAY

The new word challenge is up at Bird Is The Word and this fornight's word is "TODAY".  Just use the word in your title or journalling.. how easy is that and you could win a fantastic kit from "Tidbitz in Time"!!  There is also an optional sketch created by the lovely Nadia if you need a little inspiration.  Check out the gorgeous DT creations HERE.. truly inspirational work!!

I decided to create a card this challenge and used Nadia's fabulous sketch for inspiration.  Used some lovely pp's in pastel shades from Websters, Fancy Pants and  MME and of course had to fussy cut and layer the Websters paper.

For the title I used some Basic Grey alpha stickers and  a script computer font which I printed on paper first then attached my cut out on top with magic tape.  You can peel this off without it tearing the paper, but don't press the tape down too firmly,  just enough to keep it in place.  I use the glass on my window like a light box so I can see where to position my cut out.

To add a little detail to my strip of pp I used a Martha Stewart corner punch on the ends.  A touch of lace and a beautiful butterfly diecut to add a little softness and a bit of distressing and inking for some definition and to finish it off.

Remember you still have at least 2 weeks to enter your "Hope" challenge.  The "Amazing" challenge winners will be announced  tomorrow!!

My2Angels - Ideas With Felt

********************************************************************
Felt frames on SALE until 20th July).   

Don't forget till the 21st July there is 30% off felt at my2angels
  
  ********************************************************************

This week at My2Angels there are some fabulous ideas on how to use felt on your creations.  Check out these out and also pop on over to the blog site for more detailed information on how these were created.

Geli came up with this fab idea of covering Tracy's felt frame with some felt ribbon and using the left over pieces on a scrap of ribbon.


On this LO Tracy has used one of my favs felt products which is the scroll felt frame.  This matches perfectly with the Scrapware flourish frame.


Another gorgeous LO from Tracy using the new Websters "Let's Celebrate" papers which are IN STOCK NOW!!.. pop on over and have a looky loo, they are gorgeous.  Tracy used the felt ribbon and cut pieces to use as flourishes.. don't they look beautiful!!

Another idea is to use your felt ribbon as a mask to use with glimmermist.  Remember to place felt side down, so that when you spray on the paper backing it can be wiped off and you still get to use your felt.


HURRY YOU STILL HAVE TIME!!! 
Hope this has given you some ideas of creating with our felt trims and also our felt frames (which are on special until the 20th July).   

Don't forget till the 21st July there is 30% off felt at my2angels.

Thanks so much for stopping by and leaving some love :))) 

Saturday, July 16, 2011

Once Upon A Sketch July 15 - Guest DT

A Smile Takes But A Moment 

First up I want to let you know that I'm still here, just been a bit absent as I have been trying to catch up with some DT work, so I haven't had too much to blog about.  I will be popping in today and tomorrow to leave a little love.  I have decided to spend one day a week to post (unless I have a DT blog post) and catch up with all you lovely ladies as I am trying to organise my time a little better and thought it would be easier if I allowed one day a week to spend solely on blogging and computer work, otherwise I tend to get a little distracted if I go back and forth... can't wait to see what you've all been working on.

This month I had a guest DT spot at Once Upon a Sketch for winning last month's sketch challenge.  I created 2 LO's as a guest designer and this is the second, which I really enjoyed creating, as Nadia's sketches are always so inspiring.  The criteria for this challenge is to follow the sketch, and use a quote for your journalling. You must pop on over and check out the gorgeous DT examples... so much amazing inspiration here.


I used some BG for the background, and masked and misted a gorgeous felt frame which I purchased at the show.  The pp's and are from Prima which I distressed inked and punched.  The photos were framed with twine and a fantastic technique I learned from Louise Nelson's class at the Papercraft Show.  Had to add some flower clusters and used some Prima, Flora Doodles and paper blossoms.  The cute little heart flourish chippies I coloured with a gel pen and you can find both of these at Scrapmatts.  I have a massive stash of doilies, so I decided to hand dye a few to fit in with my colours and to add a little texture. I think the lace is from Maya Road, wish I purchased more of this as its so pretty.  Couldn't have a feminine LO without a couple of butterflies.. I'm sure you all know how much I love flowers and butterflies by now.


Some Sneaky Peeks


Thanks so much for stopping by and leaving some love :)))

Sunday, July 10, 2011

The Colour Room 66

Sunkissed

Been so busy running around after the kids on the school holidays that I 'll be so glad when they are back at school on Tuesday and I can have some uninterrupted scrapping time.

It's been a while since I created a LO for TCR, but when I saw this weeks palette of vibrant colours I had to have a go.

I went a little crazy with doilies on this LO, using a lovely paper doily and a fabulous new dienamic doily die.  I cut 2 out for under the Prima flower clusters and then cut a few more and chopped off the edges to make a lovely border under the paper doily.  Absolutely loving muslin at the moment, so I grunged a bit of muslin to created a bit of softness and finished off with a few scattered pearls.  The hand written journaling reads "there's nothing nicer than the touch of warm Summer sunshine on bare skin."


Sneak Peek
Sneak of an upcoming Guest DT LO.

Thanks so much for stopping by and leaving some love :)))

Tuesday, July 5, 2011

Bird Is The Word - HOPE

This fortnight's word for Bird Is The Word is "HOPE".  I really enjoy working on these challenges as you can pretty much create whatever takes your fancy as long as you use the word somewhere on your LO (title/journaling) and Nadia always has such awesome sketches, if you need a little help to get inspired.


I usually search the internet for a quote which resonates with me to tie in with the word as sometimes I find it easier than journaling.  This pic is from a series of photos I took of Luke recently.  He is a bit of a clothes horse and before he left to go out socializing I pleaded with him to let me take a few pics, as he looked so handsome.  Used pp's from MM & MME, some old music sheet and border strips from Crate Paper and Pink Paislee.  The balloon embellies were created with a Kaisercraft stamp and clear embossing powder, an Echo Park sticker which I lightly inked and a Scrapmatts chippie which I backed with cardstock that I embossed with a Cuttlebug Sizzix folder.  Grunged it up by distressing my edges and adding some black and gold mist splatters.


Here is the optional sketch designed by Nadia, and if you need some inspiration pop on over and check out the site as the DT creations are amazing!!   So come on and join in for your chance to win a gorgeous kit from Wendy at Tidbitz in Time.  Wendy has also created a cute badge to put on your blog if you are 1 of the 5 Feature Winners.  There is still plenty of time left for the ADMIRE challenge as well.  Can't wait to see all your beautiful creations!!

My2Angels

Don't forget to check out My2Angels as you have until the 15th July to SAVE

15% off all Glimmer Mists (these are selling out fast!)
and
15% off all Embossing Powders (including Tim Holtz)

Thanks for stopping by and leaving some love.. really makes my day to read all your gorgeous comments :)))

Monday, July 4, 2011

KIU & News To Share!!

I have just come back from visiting my sister in Toowoomba for the weekend and had a lovely time just chilling out and catching up, but it was a bit chilly up there, spent most of my time sitting in front the the fire with my blankie!  Whilst I was there I was also able to catch up with Leanne Jago, who is such a doll.  Loved seeing her amazing creations up close.. they are even better IRL!!  Thanks so much for making the time to have a coffee and a chat on your busy weekend :)))

Exciting News
WOO HOO can finally share my exciting news... I have been invited by Sofie and Andrew at Scrapmatts to be part of their amazing Design Team along with Kim Kendell!!  I was so excited when Sofie approached me as I just adore Scrapmatts chipboard, and can't wait to share my creations at the end of the month.  Pop on over and check out all the gorgeous work in their gallery and be prepared to fall in love with their awesome chipboard designs.

Kraft It Up


This month at KIU is an inspiration pic challenge,  create a layout using Kraft or Kraft Patterned Paper as your base.  You could take inspiration from the colours, the cupcakes themselves, the number of photos you use on your layout could represent how many cupcakes there are, the flowers and so forth..

Used Bazzill spotty kraft for my background and for the Martha Stewart doily punched border with some Websters and Girls Paperie pp's in the lovely soft pastel colours of the cupcakes.. some gorgeous Prima blossoms, doilies and lace to add a soft feminine touch and a lovely silver butterfly charm from My2Angels

My2Angels - More Chippie Techniques
Tracy at My2Angels has some fabulous chipboard resist techniques to share this week, so click HERE to check them out and while you're there you can check out the 15% discount on glimmer mist and embossing powders, which will be available until July 15th.


 That's it for me... thanks so much for stopping by and leaving some love :)))