Friday, July 1, 2011

Beyond the Door - June Challenge

A new month, means new challenges.  I can't believe we are already half way throught the year!!! This blog post is a bit lengthy as I have a couple of things to share, so bear with me!

YUM

When I first saw this challenge I was a bit daunted as I don't really scrap pics other than family shots.  I have to say I really loved how this came out in the end.  Used some gorgeous Websters, OA, Teresa Collins & BG pp's and some washi tape which looks fabulous when you scrunch it up. The gorgeous plate and spoon charm embellishment is from Tracy at My2Angels she also has a great variety of Baker's Twine.  Pop on over and check out her store for the papers and charms in this LO.


This month at Beyond The Door we are in the kitchen and have a fab inspiration pic for you. Pop on over and check out the gorgeous DT examples.

In addition to taking inspiration from the room, I'd like you to follow this recipe:
1 x photo or picture/drawing of a favourite food/meal/cafe/restaurant
2 x flowers
3 x kitchen related embellishments (e.g. spoons, cups, forks, crockery etc, which can be stamped or die cut or chipboard etc)
plus, I'd like to see some baking twine somewhere on your project.

Once Upon A Sketch - Guest Spot
Last month I was very excited to be chosen as a winner at Once Upon a Sketch and won a fabulous Websters pack.  As a winner I also am a Guest Designer for the month.  Here is this month's sketch challenge.. go and check out the amazing creations from the DT for some inspiration.. you won't be disappointed!!
 Here is my interpretation of the sketch using some gorgeous pp's from Bo Bunny which I grunged up a bit and layered.  Still loving hessian at the moment and had to use some to add a bit more texture.  The fleur de lis border punch is from EK Success and goes perfectly with vintage inspired pages.


Some Sad News

My 6 months has come to an end at Challenge Heaven.  Have had a fabulous time on the DT with Jess and Kyelene, but now it's time for some new faces and inspiration.  Thanks so much to Shell and Michelle for making it so enjoyable and congrats to the new girls Simone, Becci and Kerri, I 'm sure you'll have a blast!!   On a happier note, I have decided to stay on at KIU for another term along with Julie Winks and Jasmine Shae... I'd like to congratulate and welcome the new girls Lindy Gillespie, Tarrah McLean, Jodie Armitage, Rachael Funnell, Debbie Smith.. can't wait to see all your gorgeous creations!!

Thursday, June 30, 2011

Scrap The Girls

Not happy at the moment as I can't sign in to my blogger account due to updating our browser.. have been trying all yesterday and today to figure it out.  Luckily for me my daughter mentioned that she hadn't updated her browser, so I'm now on her computer, mucking around transfering photos and hoping this will work.

This is the only challenge I have completed for this month, as my mojo has gone on a holiday.  Really loved the colours for this challenge at Scrap The Girls.


Darling Buds of May
Used some old Creative Imaginations and MME Meadowlark pp's which I layered, distressed and inked.  I also used some muslin which I distressed under my photo for a bit more texture.   I stamped the edges and crumpled the white background paper and used a Martha Stewart punch in the corners.

The gorgeous circular chipboard frame is from Scrapmatts and the hanging sign is a Kaisercraft Wooden embellishment.  I backed both of them with some MME pp's.  Used a gorgeous spellbinder doily die under the main flower in my cluster and added a bit of hand dyed doily lace for a little contrast.


Still Have Time to Enter Those Challenges
You still have until midnight tonight to enter those last minute challenges.  Click on the links below to check them out and be in the running for some fabulous prizes.

Beyond The Door

Challenge Heaven

Kraft It Up

SO EXCITED!!
 I have some exciting news which I'm busting to share... so keep an eye out!!!

Thanks so much for stopping by and leaving some love :))))

Monday, June 27, 2011

My2Angels - Chipboard Techniques

Hi girls, this week at My2Angels is 'Techniques With Chipboard'.  Tracy has some gorgeous Scrapware chipboard in store and they are all 10% off at the moment.  She also still has items on sale from 30-50% off, so pop on over and check out the store for some bargains!!!

Here are some of the ways I like to jazz up chipboard.

Misting
You can use glimmer mist to make your chipboard pop and colour it to suit your LO.  It helps to cover your chipboard with glue from a gluestick or a coat of white paint so that the mist doesn't absorb into the chipboard and stays vibrant.  To achieve the technique  below which I learned from the fabulous Louise Nelson in one of her classes, give your chipboard a coat of white paint and allow to dry, spray all over with Marshmallow mist first, then mist the top half with Pop Rocks mist.  The chippie word I used is not Scrapware but Tracy has other words like this one HERE available in store.  

Other ways to use your mists on chipboard are misting all over in one colour then add some splats in another colour over the top or try using more than 2 colours on a larger piece and blending the colours.

I also love to use my chipboard as a mask on a project, then you can use it again as an embellishment on another project... you get TWO uses out of one product!! 


Crackle Paint, Dry & Wet Embossing

Dry emboss your chipboard using your Cuttlebug Embossing Folders to add some texture, then swipe over with some Tim Holtz Distress Ink to define the embossed effect.

You can also get a similar effect with wet embossing by stamping over the Mini Marilyn Bloom chipboard with a pigment ink, then using clear embossing powder to define the stamped image.

Tim Holtz Distress Crackle Paint is another way to get some fab texture on your chipboard.  Just paint over the top and allow to dry.

I have layered both my altered chippies and tied together with some Bakers Twine and add a cute locket charm.

Glossy Accents & Rubons

Inkessentals Glossy Accents add a lovely sheen to your altered chippies.  The 1st flower has been painted then topped with a Kaisercraft rubon and covered over with Glossy Accents.  The 2nd flower has been covered with patterned paper, the edges inked, a rubon added then coated with Glossy Accents.
I  coated one of the smaller chippie flowers with Ranger Puffy Embossing Powder for some fab texture then topped it with a little pearl.
Diamond Dust & Crackle Medium


Use Diamond Dust to create a gorgeous sparkly embellishment by coating your chippie with glue and sprinkling a generous coating of Diamond Dust.  Gently shake of excess and allow to dry.  I then misted my flower with Turquoise Glimmer Mist for some yummy colour.

Crackle Accent is also great for adding some grungy dimension to your chipboard.  I coated the chipboard with Tim Holtz Distressing Ink and stamped over the top in black then added a layer of  Inkessentials Crackle Accent for a fab vintage feel.

Hope these ideas inspire you to pull out some of your chipboard and have a play.

A Little Toot

Was so excited to receive an email from the gorgeous Irini last week... she asked if I would be happy to share my paper blossom ideas on her Get Creative challenge blog to introduce a new idea of a Creative Blogger on the 25th of each month.  Of course I said YES!!! and I was so flattered to be asked as the 1st Creative Blogger of the month.  Pop on over and check out the Get Creative challenge blog for some fabulous inspiration.


Cheers
Cathy:)))


Friday, June 24, 2011

A Few LO's to Share

Thought I would finally share the other 2 LO's I created at the recent Papercraft Show in Brisbane.  I had a fabulous time and learned some wonderful new techniques in Angella Peardon's & Jane Tregenza's classes.

Angella's Class - Moving Cogs

Had a lot of fun creating this moving LO in Angella Peardon's class.  We used some new chipboard cogs from Scrapmatts which were put together on the LO so that you can turn the cogs to create some movement, and they look fantastic with some gorgeous Graphic 45 pp's.  We distressed, inked, stamped and hand cut our way to a stunning LO..  just LOVE how it came out.  I know you guys have seen this photo before, but it went perfectly with the papers and is one of my fav pics, so I just had to use it again.
Pop in  HERE  and check out all the new Scrapmatts designs Andrew has created.. they are so gorgeous that you won't be able to help yourself!!

Jane Tregenza's class - Just You

Really enjoyed Jane Tregenza's class which was a gorgeous LO with lots of fussy cutting, inking & layering with again some beautiful pp's from Graphic 45 and also some lovely Imaginarium chipboard, which was right up my alley.  Just love the beautiful butterfly accents... and here is the finished LO.


A Little Toot!!

Was very excited to find out that I had won along with Sandi Taloumis and Jeni O'Connor the Once Upon A Sketch   sketch challenge and was also lucky enough to have won a fabulous prize pack from Websters, which you all know I ADORE!!  The 3 of us have been asked to share our creations for a guest spot next month as well.


Sneaky Peeks

Haven't really been able to do much scrapping other than DT commitments.  Here are a couple of sneaks for next month.


Thanks so much for stopping by and leaving some love :))))

Monday, June 20, 2011

Bird Is The Word - Admire

The new word challenge for Bird Is The Word is ADMIRE. There is also the optional sketch by the lovely Nadia... pop on over and check out the gorgeous DT examples for a bit of inspiration.


I didn't use the sketch this time around.  I found some old Cosmo Cricket pp's which I thought would go well with this recent pic of Luke and Brittany.  I don't seem to be able to part with my old papers and they always  find their way on to my LO's at some time or another.
Made this LO pretty simple by layering the pp's and outlining the floral design with a fineliner pen to accent the design.  I added a touch of lace and a cluster of Prima flowers then grunged it up with a bit of paint, ink. rubons and distressing.


Thanks for stopping by and leaving some love :)))

Saturday, June 18, 2011

My2Angels - Flower Tutorial

Baker's Twine Stitched Flowers


Hi girls, thought I would show you how to use some Baker's Twine to jazz up some paper blossoms. which you can purchase from Tracy at My2Angels by clicking on the links.  Pop on over and check it out as Tracy has a SALE on at the moment with some fantastic discounts off  papers, embellishments, ribbons, chipboard and felt.

You will have to bear with me as I am still very new to tutorials, so I hope I am explaining the steps in an easy to understand fashion.


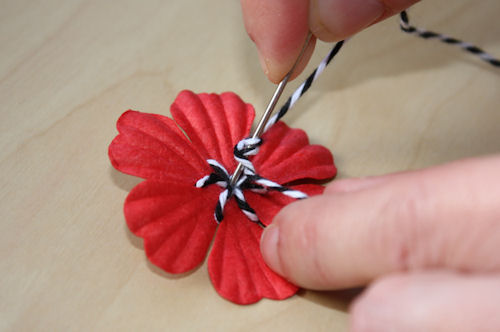
To create these stitched flowers you just need a paper blossom and a length of baker's twine.

Spider Web Flower

Take your threaded length of baker's twine and stitch through the centre of the blossom from back to the front, securing at back away from the centre.
Place the twine between the petals and stitch back through the centre.  Keep stitching until you get back to where you started with needle coming up from the back of the flower through the centre to the front.
 Thread the needle under and over the spokes of the twine going round and round
until you are happy with the width of the centre and stitch through to the back of the flower and secure.  SO EASY!!!

Stitched Blossom with Centre Knot

This flower is similar to the first, in that you follow the same 1st two steps to create the spokes with the baker's twine.
 
Loop the twine over the needle 3 times and pull taut.
Holding the thread taut and making sure the loops stay tight, thread the needle back through the centre
 to the back of the blossom
 pulling the twine tight until it forms a knot.
TIP:  The most important thing with the french knot is to keep the thread taut to get a nice even knot.

Have a little play with some blossoms and baker's twine.  You could group some french knots together for a textured centre or just use a running stitch and make your own design.  HAVE FUN!!

Cheers
Cathy :))

Friday, June 17, 2011

My2Angels - Flower Frenzy

This week at My2Angels we are showing you some different ways to use your paper blossoms.  Here are a few ideas on how to give new life to paper blossoms.


Creating some texture on your flowers by embossing them with Embossing Folders and swiping them with Ink.


You can stamp directly on to your flowers with your stamps.  A smaller overall pattern looks best.


Use glimmer mist on your blossoms to colour them to match your LO.  You can spray the whole flower or use splats for a more concentrated effect.


You can also use your flowers as a mask with your misting to create a fab background.  Use a fineliner pen to outline your images to create a little more dimension.


    Using Bakers Twine and a needle to stitch onto your flowers.


Cutting your Blossoms in half and using them as a border.


You can jazz them up by using various centres like Brads, Resin Flower, Metal Flowers and Pins.


Various mediums can also be used like Kindyglitz, Crackle Paint, Diamond Dust and Liquid Pearls.

  A few more ideas for centres, charms, cutting up a Felt Ribbon to use as a layer, a Mini Rose and scrunching a smaller blossom and adding Stamens for a bit of dimension.  You can also roll the edges of your flowers and add some Leaves.


These are just some of the ways to jazz up your paper blossoms, the ideas are endless.  If you were wanting to purchase any of these items just check out the links and they will take you straight to the item at Tracy's store.

Keep an eye out as tomorrow I will be posting a tutorial on how to jazz up your flowers with Baker's Twine.

Thanks for stopping by and leaving some love :))