Thursday, December 29, 2016

Dusty Attic - Last Post for 2016

Hi Everyone,
This is my last Dusty Attic post for 2016.  Hope you all had the most wonderful Christmas, and are ready to bring on the New Year!!

Christmas Magic
I purchased the loveliest fibre optic tree this year and was entranced by the pretty sparkly colours, so I tried to capture it on film, which wasn't an easy task!!

In love with the Star Banner chippie... a gorgeous piece and just perfect for a Christmas inspired layout.  I decided to cut into 3 sections, then embossed in white chunky embossing enamel and whilst it was still hot I randomly sprinkled with some extra fine pink glitter to match the star in my photos.

To tie in with my star theme, I used the pretty Sparkle Stencil and Dusty Attic Texture Paste on my background, then sprayed with Lindy's Cotton Candy and a touch of Autumn Maple Crimson Starburst mists.  Once dry I randomly stamped with a music background stamp.

To apply my pink glitter tinsel I mixed some Clear Gloss Varnish with a bit of water, splattered the watered down varnish on my background, then applied the tinsel.

How pretty is the new Wildflower #5 chippie, so delicate!  I altered the chippie by coating with Dusty in Colour Mountain Meadow which I lightened by mixing in a touch of white paint.  Once dry I coated with Clear Gloss Varnish.

The cute little snowflakes are from the Snowflakes chippie pack.  To give them a metallic sparkly look I coated with gesso and whilst the gesso was still wet I spinkled with silver glitter embossing powder and heat set.  I topped them with silver spacer beads and a pink rhinestone.

The magic title chippie comes from the Word Pack #15 and was altered with in the same way as the small snowflakes for a lovely touch of Christmas sparkle.


Products Used:
Dusty Attic Star Banner chipboard
Dusty Attic Wildflower #5 chipboard
Dusty Attic Word Pack #15 chipboard
Dusty Attic Snowflakes chipboard
Dusty Attic Sparkle Stencil
Dusty Attic Texture Paste
Dusty in Colour Mountain Meadow
Dusty Attic Clear Gloss Varnish
MME pp's
Stampendous embossing powders
Stampendous microfine pink glitter
Glitter tinsel - pink
Christmas music stamp
Christmas rubon
Kaisercraft rhinestones
Ranger Archival Ink - Watering Can
Silver spacer beads
Gesso

Thanks so much for stopping by.  
Happy Crafting
Cathy xx

Wednesday, December 14, 2016

Dusty Attic December Mood Board Challenge

Hi everyone,

Today I am sharing this month's Dusty Attic Mood Board Challenge and it's another stunner!!

You have the chance to win a fantastic prize of a $100 Dusty Attic Prize Voucher to use in store.  All you need to do, is use the Mood Board for inspiration, which can be interpreted in any way you like.  The only requirement is that you use Dusty Attic chipboard on your creation.  Once completed simply add your link to the right side of the bar of the Dusty Attic Blog.


"Picture Perfect"

To create my layout I was inspired by the overall elegance of the Mood Board and the beautiful colour palette.

The Mood Board photo of the mirrored dresser inspired me to use the gorgeous Vintage Frame chipboard to frame my photo.  To alter the chipboard, I coated with white embossing powder and while it was still hot I sprinkled with silver glitter, then heat embossed it once more to set the glitter.  I also embellished the frame with 2 pretty Prima resin hearts, which I swiped with a little Dusty in Colour Lavender Blush, then highlighted with Twinkling H2o Terracotta Rose and lavender microbeads.


To add a touch of greenery, I used the Corner Flourish #2 chipboard.  The flower heads were altered by painting with layers of  Dusty in Colour Lavender Blush, Lindy's Jazzy Jivin Purple Mist, as well as a touch of the Terracotta Rose Twinkling H2o,  then embossing the flourishes and Leaves chipboard with Tinby Melts embossing powder in Sherwood Green.

How gorgerous are the Lace Border and Ornate Corner chipboard pieces!!  I used them to convey the opulent elegance of the Mood Board.


The newly released and very versatile Wordpl@y chippies are just the thing to use for your titles. To make my title pop I altered the chipboard with silver embossing powder and overlayed it on top of the Lace Border which I altered with Lindy's mists and a touch of silver embossing powder.


Other Product Used
Blue Fern Studios and Basic Grey pp's
Prima velvet flower
Prima resin embellishments
Indigo Blu Blazing Poppies Stamp
Tinby Melts - Sherwood Green
Stampendous silver embossing powder
Stampendous superfine silver glitter
Hero Arts white embossing powder
Ranger watering can Archival ink
Lindy's Jazzy Jive'n Purple Magicals
Luminarte Twinkling H20's Terracotta Rose
Glitz Design Phrase Sticker
Martha Stewart Microbeads
Gesso

Thanks so much for stopping by.  I'd love to see how you are inspired by this month's Mood Board and can't wait to see your creations.  
Happy Crafting xx

Monday, November 28, 2016

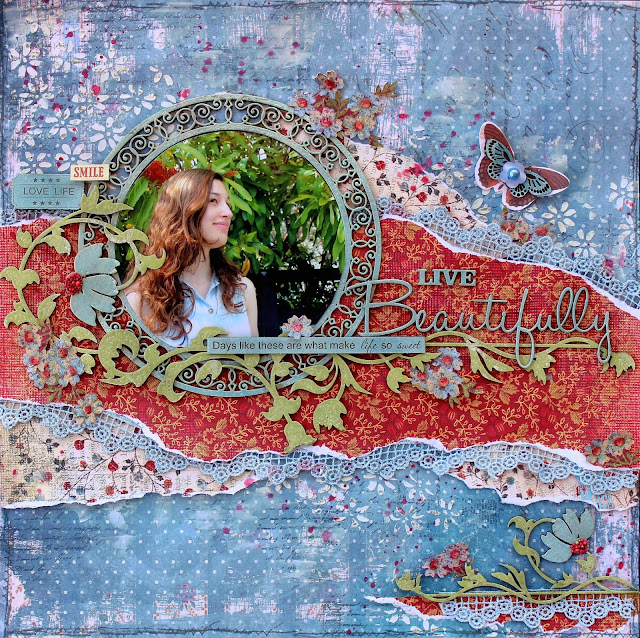
Dusty Attic DT - Live Beautifully Layout

Hi everyone, today I am up on The Dusty Attic blog today, and I have a layout to share created with a selection of beautiful Dusty Attic chipboard and mediums.

"Live Beautifully"
I have the most massive stash of pattern papers which I have accumulated over the last 10 years, as I find it very difficult to part with them.  Recently I came across some old shabby chic Daisy D's papers which I adore, and I knew I had just the right photo and beautiful Dusty Attic product to make the most of these gorgeous pp's.

I really love the Dusty Attic stencils.  There are so many beautiful designs to choose from to create your mixed media backgrounds.  For my background I decided to keep it simple using the pretty Flower Power stencil with Dusty Attic Texture Paste.  I then stamped over with a Prima script stamp in Archival Ink and flicked over with Lindy's Queen of Hearts Red Magicals for a little contrast.

The Dusty Attic chippies were altered by coating with Forrest mixed in with a touch of white paint to soften the colour and Faded Denim Dusty in Colour acrylic paint.  Whilst wet I sprinkled with Lindy's embossing powder in Madonna Robe Blue Gold and Spring Green to add a bit more colour and give the chippies  a glossy rippled texture.  Then for a little contrast and a pop of colour I used Berry Nice Prills for the daisy centres.

As you may know, I love to fussy cut to create layers and depth to my creations, so here I have fussy cut little daisies from my pp and highlighted their centres with Dusty Attic Clear Gloss Medium.  It doesn't show up very well in the photos, but it's a lovely way to add a bit of dimension to your fussy cut elements.

The Ticket and Quoted Sentiments chippies were lightly coated with Color Box mixed media ink in Patina.  Make sure you build up the colour by dabbing lightly so the imprinted words stay visible.

The Flutterbies #3 are one of my favs chippies... so pretty and the perfect addition to your feminine layouts.  I altered one of the smaller butterflies from the pack with Patina ink and layered it up with a butterfly diecut and topped it with a cute button and Kaisercraft pearl.

Dusty Attic Product Used


Other Product Used
Daisy D's pp's
Berry Nice Prills
Lindy's Stamp Gang Embossing Powder - 
Madonna Robe Blue Gold, Spring Leaf Green
Lindy's Stamp Gang Queen of Hearts Red Magicals
Prima Iron Orchid Script Stamp
49 & Market Gabis Line Stitch Stamp
Ranger Archival Watering Can
White Paint
Kaisercraft Pearls - Denim
Kaisercraft Collectables
Lace - Bella Paperie
Flower Button
Colour Box Mixed Media Ink - Patina

Thanks so much for stopping by

Happy Crafting :)


Saturday, November 5, 2016

Dusty Attic November Mood Board Challenge

Hi everyone,

We have a gorgeous new Mood Board Challenge for this month at The Dusty Attic... my favourite colours!!  Why not join us to be in for your chance to win a fabulous $100 prize voucher!! 


I absolutely adored creating with this month's Mood Board, as teal, aqua and green make the most beautiful colour palette, especially when combined with white... so fresh and pretty!!

"Beautiful Dreamer"
For my layout, I was inspired by the Mood Board pic of the flowers and humming bird, the script background on the dragonfly pic and all the frames and of course the beautiful colour palette.

To create my background I applied Dusty Attic Texture Paste through the Creative Script Stencil, then misted with Lindys Stamp Gang Tibetan Teal and Kaisercraft Lime Green, misting with water first, then applying the mist with a small round brush to create a watercolour effect.

Once dry, using the frames from the Mood Board as inspiration I stamped the background with the Prima stitched squares in teal Archival Ink.

For the top left and bottom right corners I cut up sections from the Ornate Frame #7, coated the pieces with gesso, then applied Dusty Attic Jungle Green acrylic paint.  Once dry I lightly flicked over with watered down Dusty Attic Texture Paste.

I repeated the same process with 1 of the corner flourishes from Corner Flourish #1 Pack.  I cut off the small inner flourish and used it to lengthen the flourish.

The Wrought Iron Fence Border was coated with gesso and altered by threading through with some green twine.

I used 2 different word packs to create my title which I altered by first coating with gesso, then misting with Lindy's Stamp Gang in Tibetan Teal.

For a little dimension and texture I altered my chipboard by adding a few Green Tara flowers and some pretty guipure lace pieces.

To finish off I watered down a little Dusty Attic Clear Gloss Varnish and flicked over my background, making sure to cover my photo.  Whilst the varnish was wet, I applied the Lettuce Entertain You Prills.


Chipboard


Thanks so much for stopping by.

Happy Crafting
Cathy :)