
Hi Girls,
It's a bit of a long post from me for this week as I have a LO, 2 cards and tutorials to share so bear with me. This week My2Angels is focusing on using ribbons/lace and we are showing you techniques on how to incorporate them on your own creations.

First up is my Ribbon LO... (sorry about the colour of the pics, had trouble taking the photos). I started with Kraft Cardstock (which is only 75 cents at Tracy's store.. bargain!!) for my background and then used the yummy Websters Yacht Club Diecut and other pp's from the Yacht Club range which I hand cut and layered with foam tape. Websters pp's are just perfect for fussy cutting and are one of my fav ranges for this technique.
I added some textures to my LO by using some of this beautiful cream lace flower trim to frame my photo and some hessian. The roses were made by rolling some ric rac... loved trying out this technique and you can have a go at making your own by following Tracy's tutorial which is on her my2angels blog .. so easy to make!!


I decided to combine stickers and pp's for my title by hand cutting the gorgeous alphas from Websters using the Yacht Club Alpha Stickers. I also hand cut the little white butterflies from the Websters Trendsetter Style 105 pp and finished off with one of Tracy's fab stick pins and some Jingle Bells glimmermist.
With my 1st card I decided to go masculine and used the Websters Yacht Club pp's again which I hand cut and layered and some Websters Seaside Retreat for the background. For the ribbon detail on this card I scrunched the organza ribbon for some texture. I have added a simple tutorial for those of you who haven't tried this before.

For my 2nd card I went bright and feminine using more Webster pp's in the Spring Market & Wonderfall ranges & some Basic Grey for the background. I hand cut & layered the papers and added some mini roses & a dragonfly charm for a little interest. On the border of the card I layered some velvet ric rac and a border sticker from the Spring Market image and phrase sticker sheet. I changed the colour of my white organza ribbon with some Tim Holtz Mustard Seed Distress Ink to match my pp's and then pleated the ribbon for some texture. For the sentiment I used the Spring Market alpha stickers.

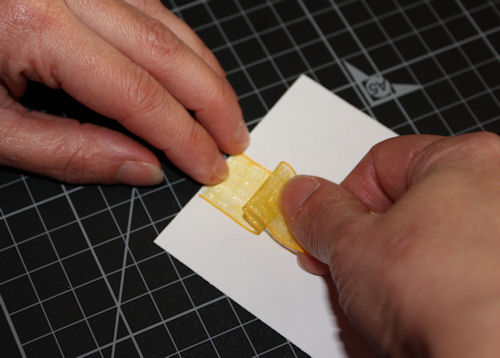
Scrunching Ribbon


Pleating ribbon is a similar technique but instead of placing the adhesive tape on your project I adhere it to the back of the ribbon to be pleated. You can just pull the backing off as you go, to make it easier, then pleat and stick down. It will stick up, so you can use you sewing machine to stitch in place or place bits of tape under each pleat to for a nice flat finish.


Cheers, and thanks for stopping by
Cathy :)))
Gorgeous work Cathy and great tutorials. I love the way you used the ric rac as waves. You clever chicky. The frame looks ace and lots of gorgeous textures.
ReplyDeleteWow Cathy just love all of it!!!! And I don't think it's too long I enjoyed reading it all!! I will be trying the pleating ribbon!!!
ReplyDeleteYou have a great weekend!!!
TONI
XOXO
gorgeous work as always cathy, and fabbo tutorials - i've always loved the way you use ribbon! have a great weekend :) xx
ReplyDeleteGorgeous Cathy, love all the details and I especially love your thank you card!!!
ReplyDeleteooohh!! Cathy a masterpiece or two here ... all wowzers ... you have made that Websters paper look absolutely stunning .. amazing stuff .. big hugz x
ReplyDeleteWOW! Cathy...Your LO & cards are Just Gorgeous....
ReplyDeleteTutorials are FABBO!!
Hope you have a wonderful week....
your layout.....i think you passed the ribbons and lace....LOL.....love your tutorials....when do you findthe time???
ReplyDeleteWow Cathy! These are awesome!!! Have a fantastic weekend and thanks so much for the love you left on my blog a couple of weeks ago! I'm all good - just moved interstate so I've been a bit preoccupied lately lol! Cheers! :D
ReplyDeletexo
Total AWESOMENESS!!!!! Amazing work Cathy and rik rak roses??!!! OMG I LOVE those!! Enjoy the rest of your weekend. :-)
ReplyDeleteGeorgeous Cathy.......love the idea of ric rac roses....I'm going to check out that tutorial.
ReplyDeleteWow! I love how you used the ribbon for the water...great idea and looks fab! Your cards are just gorgeous Cathy!
ReplyDeleteI LOVE this layout Cathy! The different framing you have used is awesome and your tutorials are so inspirating! Gorgeous card too! Thanks for sharing and hope you are well :))xx
ReplyDeleteCool Cathy! Love your ricrac rose & love to pleat my ribbon too! Everything looks so beautiful as usual...
ReplyDelete