Showing posts with label mixed media layout. Show all posts

Saturday, March 11, 2017

The Dusty Attic March Mood Board/Sketch Challenge - #Gorgeous New Look

Hi everyone, Today I am sharing my take on the this month's beautiful Dusty Attic Mood Board/Sketch Challenge. There is an amazing prize of a $100 Dusty Attic Prize Voucher for the winner.  To enter you simply need to use the Mood Board, Sketch or both for Inspiration, which you can interpret in anyway you like. The only requirement is that Dusty Attic chipboard is used on your creation. 
Once completed, simply add your link to the right side bar of the Dusty Attic Blog.  Make sure to peruse all the gorgeous creations from our Design Team while you're there for some inspiration!!

Life is Beautiful
To create my layout, I have used the Sketch and the Mood Board.  I was inspired by all the textures, the colours and flowers in the bicycle photo, as well as the soft golden beige in the feather photo.
 To create my background, I used the Lace Stencil and Dusty Attic Texture Paste, which I dried off, then misted with Lindy's mists in several colours  (it's difficult to photograph, but there are gorgeous hues of mauve, pink beige and gold).  Once dry, I stamped with Prima background stamps in Hickory Smoke Distress Ink and Versamagic Wheat Chalk Ink.
The Perforated Mesh chipboard was cut up into 4 sections, coated with gesso and whilst still wet, sprinkled with extra fine white glitter.  I absolutely adore the Crazy Stitching chippies and think they will become a firm favourite!!  To alter, I primed with gesso, then coated with Decoart Metallic Lustre in Champagne Ice. 

The Dusty Attic Bridal Veil Blooms are so pretty and add a soft and delicate touch to my layers.  I swiped over the edges of the smallest blooms with Champagne Metallic Lustre to add a bit of definition.
 The Teeny Tiny ABC chipboard are a fab way to add a touch of journaling or to use as part of your title.  I primed them with gesso, then inked with Versamagic Pixie Dust Chalk ink .
 I decided to use the labels from the 6x4 Frame Set as part of my layering and altered them by first priming with gesso, then a coat of Champagne Metallic Lustre, and a few random dabs of Crushed Coral Shimmerz Texturez.  The #gorgeous chipboard was primed with gesso, inked in Pixie Dust, then lightly coated with Crushed Coral Shimmerz Texturez by dabbing on with my finger.

To finish off and soften my page, I watered down some gesso, covered my photo, then flicked all around my layout, holding the brush fairly close to get lots of lovely little splatters.  I also lightly flicked over with Lindy's Wake Me Up Before You Go Gold.

Dusty Attic Product
Other Product
Basic Grey and Bella pp's 
Lindys Stamp Gang Mists - 
Chateau Rose, Stormy Sapphire, Wake Me Up Before You Go Gold
Decoart Metallic Lustre - Champagne Ice
Shimmerz Texturez - Crushed Coral
Kaisercraft texture stamp
Prima gesso
Prima resin corners
Prima flowers
Prima stamp
Green Tara velvet leaves
Pearl accents
Lace flowers
Lace floral trim
metal key charm
Versa Magic Chalk Ink - Pixie Dust, Wheat
Distress Ink - Hickory Smoke
Stampendous extra fine white glitter
cotton twine
recycled tag envelope

Thanks so much for taking the time to stop by.

Happy Crafting :)


Friday, January 20, 2017

Dusty Attic Jan Mood Board - Sketch Challenge

Hi all, Cathy here sharing my January Mood Board Challenge creation.

This year the monthly challenges at The Dusty Attic have an added bonus.  You can now use the sketch with the Mood Board, just the Mood Board or just the sketch.  How gorgeous is the first Mood Board/Sketch Challenge for this month!!!  Don't you just love the beautiful blue tones and delicious textures as well as the fabulous sketch!!

"Explore"


I was inspired by the sketch as well as the blue tones from the Mood Board.

When creating my layouts, one of my must haves are stencils.  I love to create texture and dimension on my backgrounds using stencils and some form of mixed media.  For this layout I have used the gorgeous new Dusty Attic Scribble Circles Stencil.  It has a lovely grungy feel, so I decided to team it with white crackle medium, then stamped over the top with a water droplet stamp from Katzelkraft and a few random splatters of Izink (a fabulous glossy metallic medium).

I layered various pp's and DA Corrugated Card with foam tape to frame my photo, then tucked in a few beach stickers from Creative Imaginations.  The corrugated card was coated with gesso, then randomly painted with Luminarte Primary Elements in Bolivian Blue, which I mixed with water in a Mini Spritz Bottle.


To frame my photo I used the new Mini Chains chippies. which I coated with gesso, then randomly dabbed over with Dusty in Colour Denim, as well as a few touches of Izink.  There are 2 different styles of chain in the pack.  I also used the smaller chain on one of my paper layers and altered it the same way.

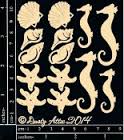
How cute are the Mini Shells chippies!!  Just the thing to add to your layers when creating a beach layout.  I used the seahorse to add a cute embellishment to my tag.  I coated it with Dusty in Colour Denim first, then painted over with Izink.  For a bit of texture I applied some mixed seed beads, which I adhered with Dusty Attic Clear Gloss Varnish.  To add a bit more depth, I very lightly swiped over the beads with gesso.
I altered the Blueprints Explore chippie the same way as the seahorse, but added a little more gesso to the edges to create depth.  To create the waves I 
To create the cluster at the top right of my layout I used the Compass Rose chippie, as well as one of the Page Pebbles #7, and a circle punched from the medallion pp.  The Compass Rose chippie was altered by coating with gesso, then painting the S E W and fleur de lis with Izink to make them pop.  I layered the centre of the rose with a sticker and one of the phrases from the Wordpl@y #7.


I also used the little starfish and scallop shell from the Mini Shells chippies in my little cluster at the bottom of my layout.  To create the effect of waves around my layers and the Explore title I used the smaller sections of the Elegant Swirls #3 and cut apart one of the larger sections, painted with gesso, then coated with Dusty Attic Clear Gloss Varnish.  I applied some mixed seed beads, with Clear Gloss Varnish inside the swirls of the waves and very lightly swiped over the beads with gesso.

To finish off I randomly stamped around my pp layers with the coral stamp from the Kaisercraft Mermaid Tales set, then applied some Prima Say it in Crystals for a touch of sparkle and shine.

Blueprint Explore - DA1430
Corrugated Cardboard - DA0830


PRODUCT USED
Dusty Attic
Corrugated Cardboard - DA0830
Other
WRMK, Authentique and Prima pp's
Creative Imaginations Beach stickers
Prima Say It In Crystals Aquarmarine
Prima White Crackle Medium
Prima Gesso
Kaisercraft Mermaid Tales Stamp Set
Katzelkraft water droplets stamp
Compass metal charm
Ranger Archival Ink Cobalt
Izink - volubilis
Luminarte Primary Elements - Bolivian Blue
Heidi Swapp Color Shine - Ocean
Seed Beads
Stickles - blue

Thanks so much for taking the time to stop by.
Happy Crafting :)

Monday, March 18, 2013

Classes With Finnabair

Hi Ladies,

I have just spent the whole weekend taking part in 4 of the most amazing classes with the uber-talented Finnabair and hosted by The Scrap Cottage.  Finn is a fantastic teacher and a talented artist.  Looking at her stunning creations IRL, you would never think you would be able to recreate them, but we did and it was so much fun.  I was really taken out of my comfort zone when it comes to the time I would normally take to create such a masterpiece, but she has shown me I can scrap my little *** off if I need to and to just do it and not overthink things so much.  I learned quite a few new mixed media techniques and I can't wait to have a play.   Unfortunately for me, now I am going to have to purchase all the yummy Luminarte and  new Prima products... so many delicious colours and fantastic metal elements!!

I had a blast and lots of laughs scrapping alongside Lindy Gillespie and Phillipa Newsham and met so many lovely ladies.  It was wonderful seeing everyone's interpretations of the classes... so many gorgeous colour combinations!!

For now, I have Saturday's classes to share with you and will share Sunday's classes in a separate post.
Industrial Baroque Layout


Everyday Treasures Shadow Box


Phillipa Newsham, Lindy Gillespie and Me
Finnabair's creative mind at work

Thanks so much for stopping by and leaving some love.