Showing posts with label Lemoncraft. Show all posts

Friday, March 23, 2018

Dusty Attic March Mood Board Challenge - Remember Today

Hi everyone,  Today I am sharing my take on this month's Mood Board Challenge at Dusty Attic.  How gorgeous is the colour palette and shabby roses and peonies theme!!
"Remember Today"

The inspiration I took from this month's Mood Board was the colour palette, pretty blooms and lace doily.
 To create my background I stencilled with the Damask #2 stencil and Prima Modelling Paste.  I then stamped the floral pattern by applying Dusty in Colour sugar plum acrylic paint to the Stampers Anonymous vines and roses stamp, then spritzed with a touch of water to give a watercolour effect.  I also stamped with Kaisercraft script background, then finished off with the beautiful Dress My Craft White Sunshine sequins for a bit more texture, which I applied with Dusty in Colour Clear Gloss Varnish.


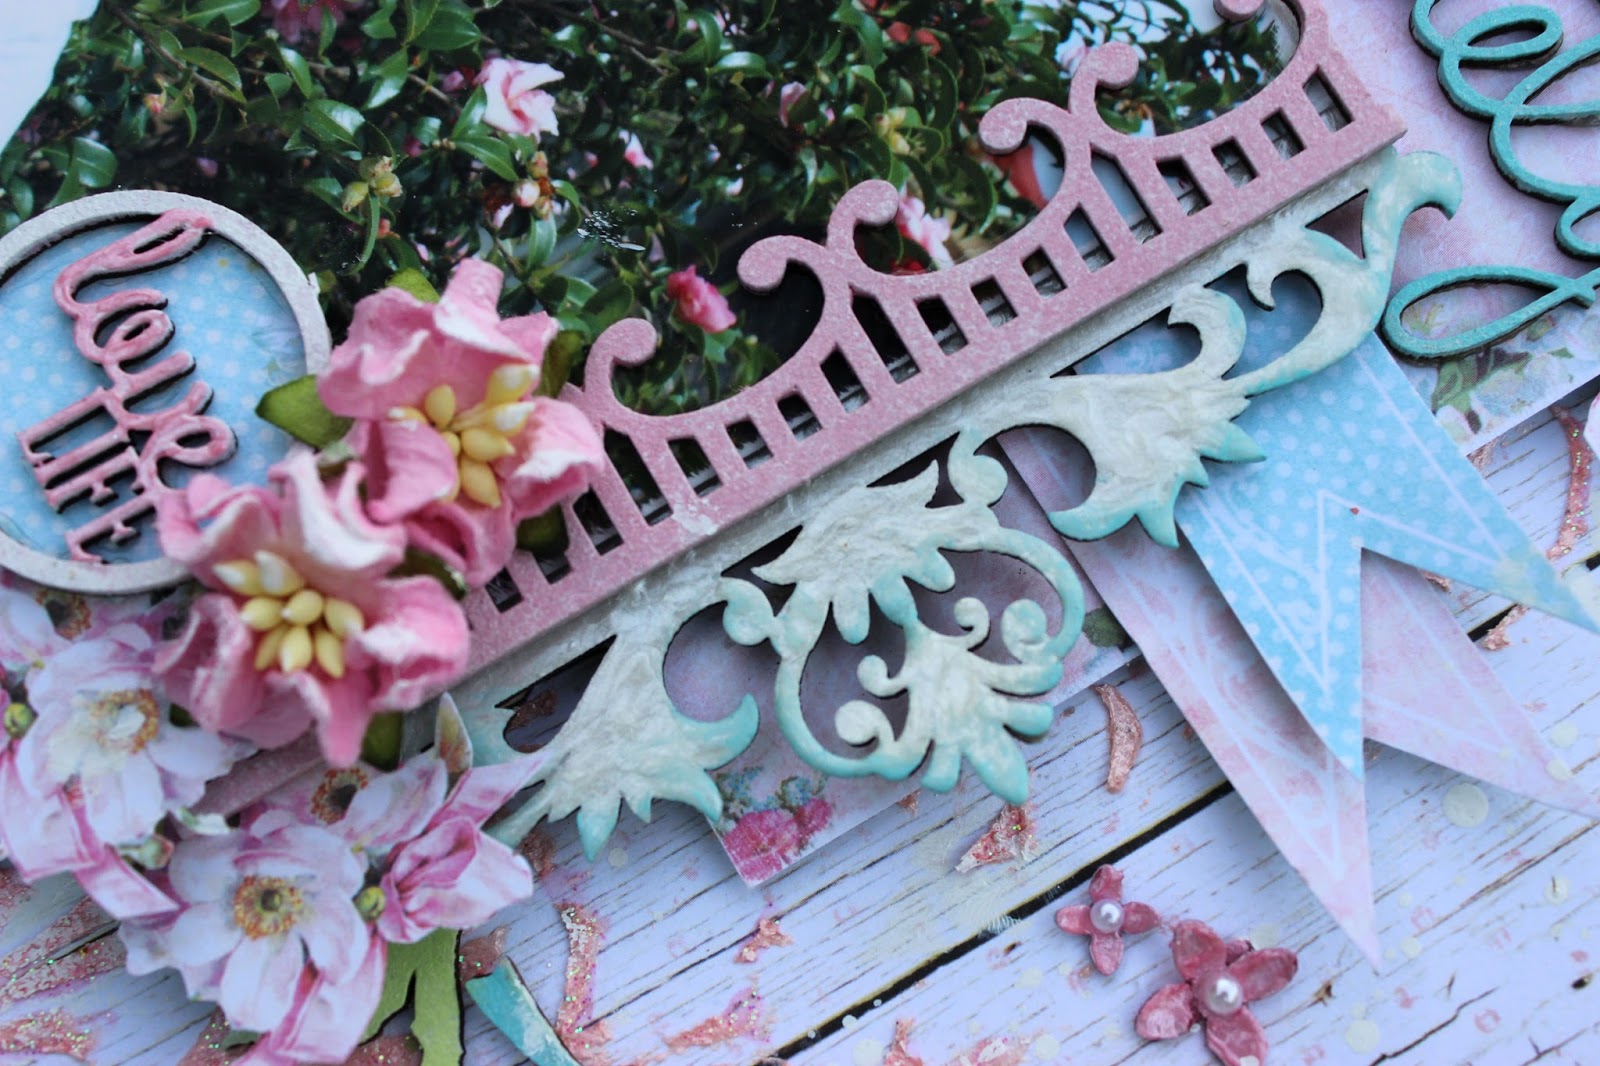
 I altered the Dusty Attic Vintage Frame #2, Lacey Trims and Foliage #1 chipboard pieces by coating first with gesso, then applying white liquid pearls, which creates a beautiful finish for those shabby chic/romantic layouts.
How sweet are the recent release Mini Captions!!  I altered my title with Dusty in Colour sugar plum acrylic paint and white liquid pearls.


Other Product Used:
Cocoa Vanilla pp 
Lemoncraft pp
Ranger Liquid Pearls
Prima Modelling Paste
Tim Holtz Stampers Anonymous Vines and Roses stamp
Pearl embellishments
Lace flowers
Kaisercraft Script Background stamp
Distress Ink - hickory smoke

Thanks so much for stopping by.
Happy Crafting
Cathy :)

Monday, January 16, 2017

First Post for 2017 Dusty Attic Design Team

Hi everyone,

I am so excited to be part of The Dusty Attic Design Team for another year!!  OMG we have some very inspirational artists lined up for 2017... it's going to be an amazing year!!!  Today I am sharing my first project... here's to a creative, inspirational and fantabulous 2017!!

Dream Passionately
I recently came across these gorgeous Lemoncraft pp's which have been sitting in my stash of pp's for a while, so I was inspired to create this soft and feminine layout using beautiful Dusty Attic chippies and a lovely Dusty Attic stencil to add texture and dimension to my creation.

To create my background I used the lovely Fan Stencil with Shimmers Texturez.  Once dry, I went over with pink Stickles for a little sparkle, then splattered over randomly with watered down white paint to soften.

The Birds on a Branch #2 chippies were cut into sections and coated with gesso, then painted with Dusty in Colour Jungle Green.  The birds were painted with Dusty in Colour Oceania. and the edges with Dusty in Colour Jungle Green.  I highlighted the edges of the leaves in white to add depth.

To tie in with the pretty flowers in my photo, I coated some of the Mini Blossoms with Liquid Pearls, using the Dusty Attic Pearls for the flower centres, then randomly glued the blossoms to the branches and background.

 I love using frames to draw the eye to my photos.  Here I have used the large frame from the Decorative Frame Set, which I coated with Liquid Pearls, then highlighted the edges with Dusty in Colour Oceania.

To add another layer and a bit of contrast to the frame, I cut up a strip from the Fancy Trim #5 pack and painted with Dusty in Colour Dusty Pink, then used a sponge with a touch of white paint and lightly dabbed over the chipboard to soften the colour.


Word Disks chippies are perfect for adding a bit more dimension to your clusters/layers.  I used the 'love life' disk from the Word Disks #1 in my little flower cluster.  I painted the disk white, then coated the word with pink Liquid Pearls.  Once dry I backed with chippie with a contrasting pp.


The title is from the Live Beautifully pack and has been coated with gesso first, then painted with Dusty in Colour Oceania.


PRODUCT USED
Thanks so much for taking the time to stop by.
Happy Crafting :)


Friday, November 27, 2015

The Scrapbook Store - Lemoncraft Christmas Greetings Layout


Hi Everyone,

Today I am sharing my final layout for the month at The Scrapbook Store using the beautiful Lemoncraft Christmas Greetings Collection.

Most Wonderful Time of the Year Layout
For this layout I decided to mix a bit of lime green and pink hues with the traditional colour palette of this collection to give it a more youthful look to tie in with this cute photo of Luke and Brittany when they were much younger, capturing the excitement of opening their presents on Christmas day. 


Lemoncraft - Christmas Greetings Collection

 The background was created by cutting up various sized sections of the cover sheet from the Lemoncraft Basics Collection which has a pattern on the reverse side, and sanding the edges with Kaisercraft sanding block, leaving you with a lovely crisp white borders.  I then overlapped and adhered the pieces to create a base for my photo.  


The layers were masked with Faber Castell whipped spackle and Tim Holtz flourish stencil, then randomly stamped with a cute snowflake image.  I mixed various flowers, red glittered berries and diecut pine sprigs to frame my photo, then added some pretty lime green sequins for a bit of sparkle and finished off by using a brush to flick the background with lime Kaisermist.


Green Tara - Mini Blossoms Rose
To alter the Blue Fern Santa's Sleigh chipboard piece, I coated with Faber-Castell whipped spackle then used a palette knife to create peaks by laying flat on the whipped spackle and lifting up the knife.  Whilst the whipped spackle is still wet I sprinkled with Zing leaf green embossing powder and set with a heat gun.

Blue Fern Studios Santa's Sleigh Chipboard

Product List
Lemon Craft - Christmas Greetings - 12"x12" Double Sided Patterned Paper - A Lot Of Hope
Lemon Craft - Christmas Greetings - 12"x12" Double Sided Patterned Paper - Let Your Dreams Come True
Lemon Craft - Christmas Greetings - 12"x12" Double Sided Patterned Paper – Basic Collection
Kaisercraft - 12"x12" Textured Cardstock – Fern
Bazzill - Card Shoppe 12"x12" Heavy Weight Cardstock - Caramel Apple
Blue Fern Studios - Chipboard - Santas Sleigh
Green Tara - 2.8cm Mini Blossoms - Rose
The Scrapbook Store - 1.5cm Mini Flowers 10pk – Red/White
Tim Holtz - Idea-ology - Fasteners - Yuletide
Tim Holtz - Layering Stencils – Flourish
Couture Creations - Christmas Emporium - 4x6" Stamp Set - Seasons Greetings
Sizzix - Tim Holtz Alterations Thinlits Dies – Holiday Greens
Kaisercraft - Kaiser Mists - Lime Green
Kaisercraft - Sanding Block 2 pack
American Crafts - Zing Embossing Powders - Opaque Leaf
Faber-Castell - Whipped Spackle 100ml
Ranger - Archival Ink Pad – Jet Black
Martha Stewart star border punch
Inkadinkado Christmas Characters Stamp Set
Other:  sequins, berries, flowers

Thanks so much for stopping by :)

Friday, November 20, 2015

The Scrapbook Store - Lemoncraft Christmas Greetings

Hi Everyone,

Today I am sharing my third project created for The Scrapbook Store using the beautiful Lemoncraft 'Christmas Greetings' Collection.  Pop into the store and grab this gorgeous Christmas Collection before it goes flying out the door!!

Merry Christmas
I have cut various pieces of pp and layered with foam tape to create to create a background for my silhouetted photo.
 Using the layers as a guide I masked the background pp with the Tim Holtz Snowflake stencil and Faber Castell Whipped Spackle, then dried with heat gun until the spackle puffed up a little.  I outlined the snowflakes with a fineliner pen to make them pop, and stamped over the masking with the Kaisercraft music texture stamp in carnation red ink.
I adhered the layers to my background leaving the edges free, so that I could tuck in some lace accents, then embellished the layers with Green Tara and Petaloo flower clusters and some pretty Scrapmatts pine sprig chipboard pieces which I altered by spraying with 2 different colours of green mist.
How yummy are the Prills!!  I have used the Heart of Gold Prills to add texture and sparkle to my layout by adding them around the lace and edges of my pp.  Finally, I covered my photo and flicked the background with Pearlex solar gold, Kaisercraft lime green and Lindys Sea Mint Green mists.


Products Used:
Lemon Craft - Christmas Greetings - 12"x12" Double Sided Patterned Paper - A Lot Of Faith
Lemon Craft - Christmas Greetings - 12"x12" Double Sided Patterned Paper - A Lot Of Joy
Lemon Craft - Christmas Greetings - 12"x12" Double Sided Patterned Paper - Let Your Dreams Come True
Green Tara - Fabric Vines - 19cm Green with White Blossoms
Petaloo - Mixed Textured Blossoms – Red
Petaloo - Wild Mini Blossoms - Soft Green
Tim Holtz - Idea-ology - Fasteners - Yuletide
Tim Holtz - Layering Stencils - Snowflakes
Lindys Stamp Gang - Starburst Mist - Sea Mint Green
Kaisercraft - Kaiser Mists - Lime Green
Kaisercraft - Textured Clear Stamps - Sheet Music
Jacquard - Pearlex Powdered Pigments - Solar Gold
Prills - Heart Of Gold
Faber-Castell - Whipped Spackle 100ml
Faber-Castell - Gesso 100ml
Ranger - Archival Ink Pad - Wendy Vecchi Designer Series - Carnation Red
Scrapmatts Pine Sprig Chipboard
Twine, bells, lace, ink

Thanks so much for stopping by :)

Sunday, November 15, 2015

The Scrapbook Store - Lemoncraft Christmas Greeting Collection

Hi Everyone,

Today I have my second layout created for The Scrapbook Store using the beautiful new Lemoncraft Christmas Greetings Collection.


December 25th
 This beautiful collection has a lovely vintage feel to it in traditional Christmas colours, which I love as my children are young adults now, so for me, it's a bit of a challenge to use some of the cuter Christmas paper ranges.

To tie in with the vintage feel of this Collection I decided to grunge it up a little by tearing and layering my papers, then using the Prima gold crackle medium and random misting.


I have added a trailing flower cluster in Christmas colours, then highlighted the red flowers with solar gold Pearlex Powdered Pigment mixed with a little water and applied with a small brush to tie in with my gold crackle background and the sparkle elements.
 My Kaisercraft wooden flourish was altered by first applying a coat of Faber-Castell gesso, then embossing with the Lindy's Weeping Willow embossing powder, giving it several coats by reheating each time to apply the embossing powder.  I reheated one last time, then whilst hot randomly applied some of the Prima microbeads.  Once cooled, I painted little touches of the solar gold Pearlex pigment. to add some highlights.  The Merry Christmas title was painted with gesso, then coated with Prima gold crackle medium.


Product List
Petaloo – Grape Leaf Vines
Kaisercraft Wooden Flourishes – Dec 25th, Merry Christmas
Other:  glitter berries, flowers, lace flowers

Thanks so much for stopping by :)